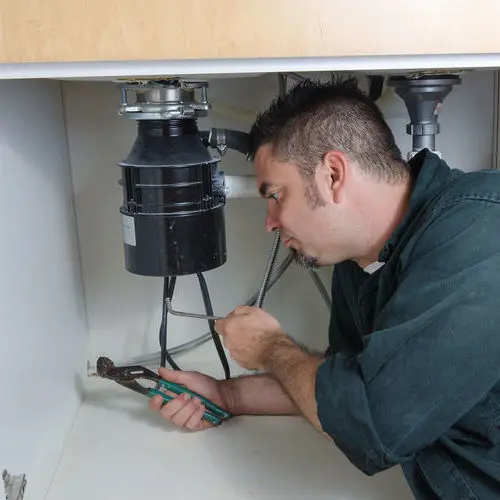
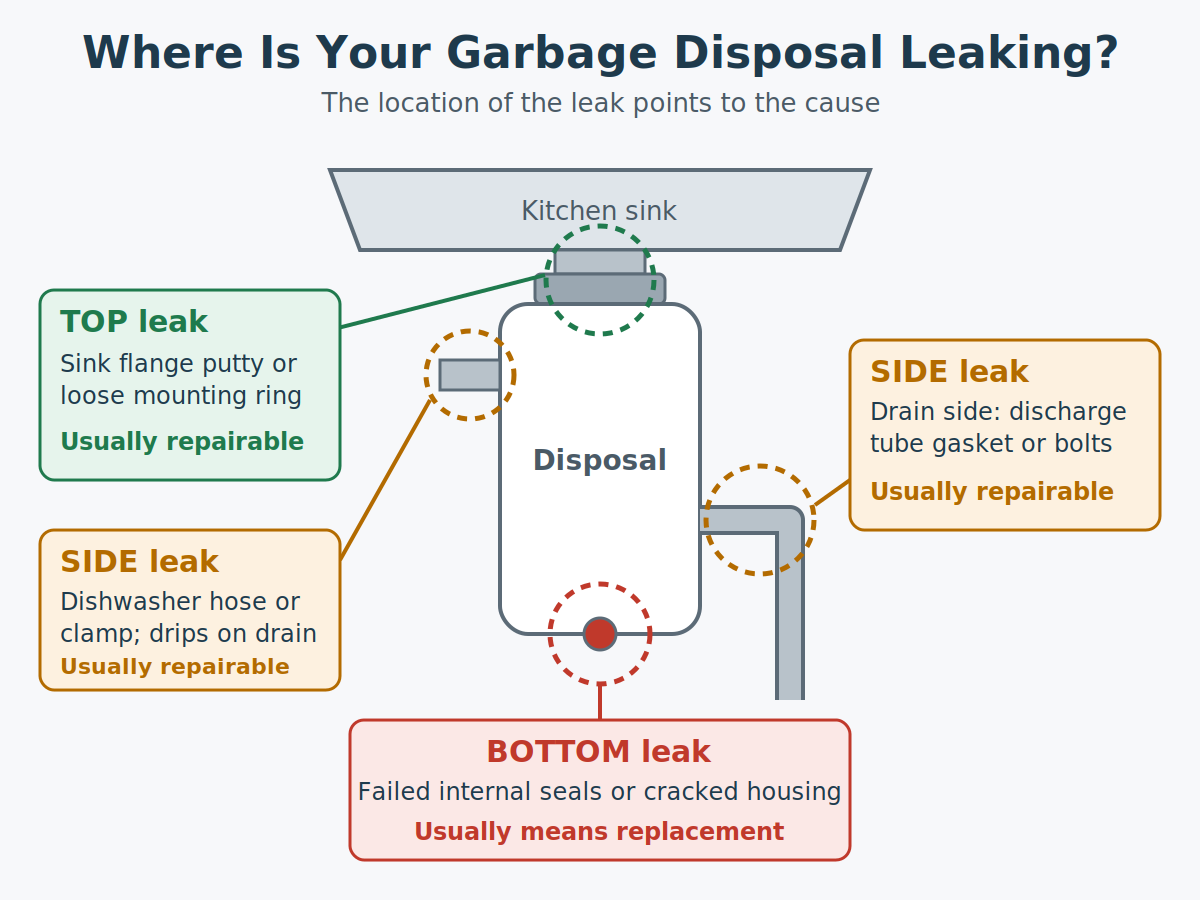
Why is my garbage disposal leaking? Where the water shows up tells you. A leak at the top usually means the plumber’s putty at the sink flange has failed or the mounting assembly has loosened. A leak on the side points to the dishwasher hose or the discharge tube. A leak from the bottom usually means the internal seals have worn out, and the unit needs to be replaced.
Most top and side leaks are fixable with basic tools. Before you start, turn off the disposal at the wall switch and at the circuit breaker, or unplug it if it’s plugged into an outlet under the sink.
How to Find Where Your Garbage Disposal Is Leaking
Water travels. A drip from the top of the disposal can run down the side and fall off the bottom, which makes a simple fix look like a dead unit. Take five minutes to find the true source first.
Dry everything. Wipe down the disposal, the pipes, the dishwasher hose, and the cabinet floor with paper towels until nothing is damp.
Grab a flashlight. You’ll want to see the top, both sides, and the bottom of the unit clearly.
Run cold water into the sink for 30 to 60 seconds and watch for the first sign of moisture.
Turn the disposal on with the water running. Some leaks only appear when the unit is vibrating.
Run the dishwasher’s drain cycle if nothing has shown up yet. Leaks at the dishwasher connection only appear when the dishwasher pumps water through it.
Note where water appears first. That spot is your answer.
Also check above the disposal. A leak at the base of the faucet or at the sink’s supply lines can drip down onto the disposal and look like a disposal leak. If that’s the source, you need a faucet repair, not a new disposal.
Why Is My Garbage Disposal Leaking? Match the Leak to the Cause
Garbage disposal leak location, likely cause, and fix
Where the leak appears
Likely cause
Usual fix
Top, where the disposal meets the sink
Dried or cracked plumber’s putty at the sink flange
Remove the flange, clean it, and reseal with fresh putty (DIY-friendly)
Top, with a disposal that wobbles
Loose mounting assembly
Tighten the mounting ring and screws (DIY-friendly)
Side, only when the dishwasher drains
Loose clamp or worn dishwasher drain hose
Tighten or replace the clamp or hose (DIY-friendly)
Side, at the pipe running to the drain
Worn gasket or loose bolts on the discharge tube
Replace the gasket and tighten the connection (DIY-friendly)
Bottom, often near the reset button
Failed internal seals or a cracked housing
Replace the disposal
Where a garbage disposal leaks tells you what failed: top and side leaks are usually repairable, while bottom leaks usually mean replacement.
1. Worn Plumber’s Putty at the Sink Flange
The sink flange is the metal collar that sits in the sink’s drain opening. A ring of plumber’s putty seals it to the sink. Over years, that putty dries out, shrinks, and cracks, and water starts seeping between the flange and the sink before dripping onto the top of the disposal.
To reseal it:
Turn off power to the disposal at the breaker.
Disconnect the dishwasher hose and discharge tube, then remove the disposal from the mounting ring. Support the unit from below, since disposals are heavier than they look.
Loosen the mounting assembly and push the flange up and out of the sink.
Scrape all the old putty off the flange and the sink opening, then clean both surfaces.
Roll a fresh, even rope of plumber’s putty, press it around the underside of the flange lip, and set the flange back in the drain.
Reinstall the mounting assembly, tighten it evenly, wipe away the excess putty, and remount the disposal.
Reconnect the hoses, restore power, and run water to check for leaks.
2. A Loose Mounting Assembly
The disposal hangs from a mounting assembly that clamps to the flange. Years of vibration can loosen it enough to break the seal even when the putty is fine. If the disposal wobbles when you push on it, tighten the mounting assembly first. It takes a few minutes and sometimes solves the leak on its own. If the drip returns, reseal the flange.
3. The Dishwasher Hose Connection
If your dishwasher drains through the disposal, its drain hose connects to a small inlet on the side of the unit with a hose clamp. That clamp can loosen or corrode, and the hose can crack with age. Because the leak only appears when the dishwasher drains, it’s easy to miss.
Tighten the clamp with a screwdriver. If the clamp is rusted or the end of the hose is cracked, replace them. Hose clamps are inexpensive and widely available.
4. The Discharge Tube Gasket
The discharge tube is the bent pipe that carries ground-up waste from the disposal to the drain line. It connects to the disposal with a rubber gasket and a flange held by bolts. The gasket hardens over time, and vibration loosens the bolts.
Tighten the bolts first. If the leak continues, remove the tube, replace the gasket with one that fits your model, and reinstall it. Also check the slip nut where the tube meets the P-trap. If the leak is farther down the drain line, or the drain backs up when you run the disposal, the problem may be in the pipe itself, and professional drain cleaning may be the fix.
5. Failed Internal Seals or a Cracked Housing
A leak from the very bottom of the disposal, often around the reset button, is different from the others. It doesn’t come from a connection. It comes from inside the unit, where seals keep water in the grinding chamber away from the motor. When those seals wear out, or the housing cracks, water escapes out the bottom.
This is the one leak that almost always means replacement. The internal seals generally aren’t sold as consumer repair parts, and the labor to take the motor apart would typically cost more than a new disposal. Stop using the unit, keep the power off, and plan a replacement. Water leaking near a motor and wiring is not something to keep running.
How to Prevent Garbage Disposal Leaks
A few habits help your disposal and its seals last longer:
Keep grease and oil out of the drain. They coat the unit and the pipes and contribute to clogs.
Don’t overload it. Feed food in gradually with the water running instead of packing the chamber first.
Don’t overtighten fittings. Plastic fittings and the housing can crack under too much force.
Look under the sink every month or so. Catching a slow drip early protects the cabinet.
If you do find water, dry the cabinet out quickly. The U.S. Environmental Protection Agency’s guidance is to respond to clean water damage within 24 to 48 hours to help prevent mold growth, which matters in a closed sink cabinet.
When to Call a Plumber
Call a licensed plumber when:
The leak is coming from the bottom of the unit
Water is near the disposal’s wiring or the outlet under the sink
You’ve tightened and resealed the connections, and it still leaks
The disposal body is visibly cracked
The cabinet floor is soft, swollen, or stained from a long-term leak
Kinnett Plumbing’s garbage disposal repair service starts with finding the real source. If a new gasket or fresh putty will fix it, that’s what we’ll recommend. We’ll only suggest a replacement when the unit actually needs one.
Frequently Asked Questions
Can a garbage disposal leaking from the bottom be fixed?
Usually not. A leak from the bottom almost always means the internal seals have failed or the housing has cracked. Those seals generally aren’t sold as repair parts, and taking the motor apart typically costs more than a new unit. Before you give up on it, dry the unit and retest to confirm the water isn’t dripping down from the top or side.
Why does my garbage disposal only leak when the dishwasher runs?
That pattern points to the dishwasher drain connection on the side of the disposal. The clamp holding the dishwasher hose may be loose or corroded, or the hose may be cracked near its end. Tighten the clamp first, then replace the clamp or hose if the leak continues. Watch the connection during a drain cycle to confirm it.
Is it safe to use a leaking garbage disposal?
It’s best to stop using it until you find the source. A leak at the sink flange or a side connection isn’t dangerous on its own, but it will keep damaging the cabinet. A bottom leak means water is getting near the motor and wiring, so keep the power off and plan a replacement.
Should I use hot or cold water with a garbage disposal?
Use cold water. Disposal manufacturers recommend a steady stream of cool or cold water while the unit runs, because it keeps fats solid so they move through the drain instead of coating the unit and pipes. Keep the water running for a few seconds after grinding stops to flush the drain line.
Get Your Kitchen Sink Back to Normal
Most garbage disposal leaks are small fixes. When they aren’t, you want a plumber who will tell you straight. Kinnett Plumbing is a licensed, family-owned plumbing company based in Manassas, with a 4.9-star rating across 811 reviews from Northern Virginia homeowners.
Fall sump pump maintenance comes down to a few checks before storm season: clear leaves away from the discharge outlet, clean the pit and intake screen, bucket-test the float switch, test the battery backup with the main pump unplugged, and make sure the check valve and power supply are sound. Plan on about an hour, and finish before the first big fall storm.
This is the fall-specific version of our routine. For the full year-round schedule, see our sump pump maintenance checklist.
Why Fall Is Hard on Northern Virginia Sump Pumps
Fall asks more of a sump pump than almost any other season. Several things tend to pile up at once:
Heavy rain from late-season storms. The Atlantic hurricane season runs through November 30, and the remnants of tropical systems can bring several days of soaking rain to the region.
Falling leaves. Wet leaves collect around the outdoor end of the discharge pipe and can block it within a single windy week.
Power outages. The same storms that fill your sump pit can knock out power, which is exactly when a standard pump stops working.
A pump that’s been sitting idle. After a dry stretch in late summer, a pump may not have run in weeks, and a stuck float or seized impeller won’t show itself until the pit fills.
Your Fall Sump Pump Maintenance Checklist
Work through these steps in order. Always cut power to the pump before you put your hands in the pit.
Start outside at the discharge outlet. Clear leaves, mulch, and debris from the end of the pipe, and confirm the water will drain away from your foundation, not back toward it.
Unplug the pump or switch off its circuit before touching anything in the pit.
Clean the pit and intake screen. Lift the pump out if you can, scoop out silt and gravel from the bottom of the basin, and brush off the intake screen.
Check that the float moves freely. Make sure the float can rise and fall without catching on the pit wall, the power cord, or the discharge pipe.
Listen when the pump shuts off. A rush of water flowing back into the pit points to a failing check valve.
Test the battery backup using the steps in the section below.
Check the power supply. Look over the cord for damage, plug the pump directly into its outlet rather than an extension cord, and confirm the circuit breaker is on.
How to Clear a Clogged Sump Pump Discharge Line
A blocked discharge line is one of the most common reasons a pump fails during a storm. With nowhere for the water to go, the pump runs against the blockage, overheats, and can burn out.
Walk the line from where it leaves your foundation to where it ends in the yard. Clear the outlet, and check any extension pipe or buried line for crushed sections. If water backs up in the pipe or the pump runs without moving water even after you’ve cleared the outlet, the clog may be inside the line. That’s a good time to call a plumber, since forcing a buried line can damage it.
A battery backup is your protection when a storm takes out the power. According to NDSU Extension, a typical backup system uses a 12-volt DC pump powered by a battery on a specially designed trickle charger, with its own check valve on the outlet pipe and a float set to turn on only when water rises above the primary pump’s turn-on level.
To test it:
Confirm the battery is fully charged using the indicator on the control unit.
Shut off power to the main sump pump and to the backup system’s charger.
Pour water into the pit until the backup pump turns on.
Watch that it empties the pit and shuts off on its own.
Restore power to both the main pump and the charger.
If you don’t have a backup yet, fall is a good time to add one. Kinnett Plumbing installs backup and battery-powered sump pumps as part of our sump pump installation and repair services.
What Your Sump Pump Is Telling You
If something didn’t look or sound right during your checks, use this table to narrow it down.
Common sump pump symptoms and what they usually mean
Symptom
What it usually means
What to do
Hums but doesn’t pump
Jammed impeller, clogged intake screen, or blocked discharge line
Unplug it, clear the intake and outlet, and retest. Call a plumber if it still hums.
Turns on and off constantly
Water flowing back through a failed check valve, or a float set too tight
Listen for backflow when it shuts off. A worn check valve should be replaced.
Runs without stopping
Stuck float switch, or water coming in faster than the pump can remove it
Check that the float moves freely. If it does, the pump may be undersized.
Won’t turn on at all
Tripped breaker, unplugged cord, stuck float, or a failed motor
Check power first, then the float. A dead motor means replacement.
Water keeps rising toward the top of the pit
The pump can’t keep up with the inflow
A larger pump or a backup may be needed. Call for an assessment.
Backup system alarm is sounding
Low battery or a charger problem
Check the control unit and battery per the manufacturer’s instructions.
Water pooling near a basement bathroom or laundry area instead of the sump pit may be a different system. An ejector pump handles wastewater from below-grade fixtures and needs its own ejector pump service.
When to Call a Plumber
Routine fall checks are a homeowner job. Call a licensed plumber when:
The pump fails the bucket test or the battery backup test
You’ve cleared the outlet, but the discharge line still seems blocked
The check valve is letting water flow back into the pit
You don’t know how old the pump is, and it’s never been professionally checked
You want to add a battery backup before the next outage
If your pump fails in the middle of a storm and water is rising, contact our emergency plumbing team.
Frequently Asked Questions
When should I do fall sump pump maintenance?
Aim for September or early October, before leaves start dropping heavily and before the late-season storms that often reach Northern Virginia. Test again after any long power outage, and give the pump another check in late winter before spring rains. If your pump runs often, check it more frequently.
Why is my sump pump humming but not pumping water?
A hum usually means the motor is getting power but can’t move water. Common causes are a jammed impeller, a clogged intake screen, a stuck float, or a blocked or frozen discharge line. Unplug the pump right away to protect the motor, clear what you safely can, and call a plumber if it still won’t pump.
Does a battery backup sump pump need its own check valve?
In a typical setup, yes. NDSU Extension describes backup systems with their own check valve on the backup pump’s outlet pipe, which then connects to the primary pump’s discharge line. Without it, water pushed out by one pump can flow back into the pit through the other. A plumber can confirm your setup is plumbed correctly.
What should I do if my sump pump fails during a storm?
Stay out of standing water if the pump or any outlet may be energized. If you can reach the breaker safely, cut power to the pump. Move belongings to higher ground, and start removing water with a wet vacuum or a portable pump if you have one. Then call a plumber for emergency service.
Get Your Sump Pump Ready Before the Storms
A few minutes now is a lot easier than a flooded basement later. If your pump didn’t pass one of the checks above, or you’d like a battery backup installed before storm season, Kinnett Plumbing can help. We’re a licensed, family-owned plumbing company based in Manassas, and we’ll give you an honest assessment of what your system needs and what it doesn’t.
A tank water heater typically lasts about 10 to 15 years, and a tankless water heater about 20 years, according to the U.S. Department of Energy. So how long does a water heater last in your home? That depends on your water quality, how well the unit is maintained, and how hard your household works it. Once a tank passes 10 years, start watching for warning signs.
Below, we’ll cover the typical lifespan by type, what wears a water heater out early, the signs yours is running on borrowed time, and how to decide between repairing it and replacing it before it fails.
How Long Does a Water Heater Last by Type?
The type of water heater makes the biggest difference. Storage tanks wear out fastest because the tank itself eventually corrodes, and a corroded tank can’t be repaired.
Typical water heater lifespan by type
Water heater type
Typical lifespan
What usually ends its life
Conventional storage tank (gas or electric)
10 to 15 years
Tank corrosion and leaks, often sped up by sediment
Tankless (on-demand)
About 20 years
Scale buildup in the heat exchanger and worn components
Heat pump (hybrid electric) storage
ENERGY STAR’s savings estimates assume about 13 years
Tank corrosion, plus wear on the compressor and controls
Two water heaters installed on the same day can fail years apart. These are the usual reasons:
Sediment buildup. Minerals in your water settle at the bottom of the tank. That layer makes the burner or elements work harder and longer to heat the water, which adds stress and speeds up wear.
A used-up anode rod. Tank water heaters have a sacrificial anode rod that corrodes so the steel tank doesn’t. Once the rod is gone, the tank starts to rust from the inside.
High temperature settings. Running the tank hotter than you need increases energy use and wear.
Heavy demand. A unit that’s too small for your household cycles constantly and wears out sooner.
High water pressure. Excess pressure strains the tank, fittings, and relief valve over time.
7 Signs Your Water Heater Is on Borrowed Time
Most water heaters give warnings before they fail. If you notice any of these, have the unit inspected before it becomes an emergency:
It’s more than 10 years old. Age alone is a good reason to start planning, especially for a tank model.
Rusty or discolored hot water. Brown or orange hot water can point to corrosion inside the tank.
Popping, rumbling, or banging noises. This is usually water trapped under a layer of sediment, boiling and bursting through as the unit heats.
Moisture or water around the base. A leak from the tank itself means the unit needs to be replaced.
Less hot water than it used to make. Sediment takes up space and insulates the water from the heat source.
Temperature swings. Water that runs hot, then lukewarm, can mean a failing thermostat, heating element, or heavy sediment.
Corrosion on fittings, valves, or the tank. Rust or crusty buildup on the connections is an early sign of trouble.
If your water heater shows one or more of these signs, our water heater services team can tell you whether a repair makes sense or whether it’s time to plan a replacement.
How Can You Tell How Old Your Water Heater Is?
Start with the label, or rating plate, on the side of the unit. Many manufacturers code the manufacture date into the serial number, but the format varies by brand. If you can’t decode it, your installation paperwork or home inspection report may list the date, or a plumber can read the serial number for you during a service visit.
Should You Repair or Replace Your Water Heater?
Many water heater problems can be repaired. A thermostat, heating element, gas control part, drain valve, or temperature and pressure relief valve can often be replaced without replacing the whole unit.
Replacement usually makes more sense when:
The tank itself is leaking
The unit is past 10 years old and needs repeated repairs
It can no longer keep up with your household’s hot water needs
The repair cost is high compared to the price of a new unit
Test the temperature and pressure relief valve as part of routine service. It’s a key safety device.
Descale tankless units on the schedule the manufacturer recommends so mineral scale doesn’t build up in the heat exchanger.
Why Replace Your Water Heater Before It Fails?
When a water heater fails without warning, you’re dealing with no hot water, possible water damage, and pressure to pick a replacement fast. Planning ahead lets you choose the right type and size, schedule the work, and avoid cleanup costs on top of the new unit.
It’s also the best time to consider a more efficient model:
Gas tankless water heaters: ENERGY STAR estimates certified models save a family of four about $95 per year, or $1,800 over the unit’s lifetime, on gas bills compared to a standard gas storage model.
According to the U.S. Department of Energy, a conventional storage tank water heater typically lasts 10 to 15 years, and a tankless water heater lasts about 20 years. Water quality, maintenance, temperature settings, and household demand all affect where your unit falls in that range. Tanks that are never flushed often land at the shorter end.
Do water heaters really last 20 years?
Tankless water heaters can. The Department of Energy and ENERGY STAR both put their expected life at about 20 years with proper maintenance. A standard storage tank rarely reaches 20 years, because the tank eventually corrodes. Most tank owners should start planning for a replacement once the unit passes 10 years.
Should I replace a 10-year-old water heater that still works?
Not automatically, but it’s a good time to have it inspected. A plumber can check for corrosion, sediment, and a worn anode rod and tell you how much life is likely left. Replacing on your own schedule avoids the risk of a sudden tank leak and gives you time to compare more efficient options.
Can a leaking water heater be repaired?
It depends on where the leak is. A leak from a drain valve, relief valve, or pipe connection can often be repaired. A leak from the tank itself can’t be fixed, because it means the tank wall has corroded through. In that case, shut off the water and power or gas to the unit and plan a replacement.
Does flushing a water heater make it last longer?
Yes. Flushing clears the sediment that settles at the bottom of the tank, which reduces strain on the burner or heating elements and helps the unit heat efficiently. Once a year is a good baseline for most homes. Pairing annual flushing with periodic anode rod checks is one of the best ways to extend a tank’s life.
Get a Straight Answer on Your Water Heater
If your water heater is past 10 years old or showing any of the warning signs above, Kinnett Plumbing can inspect it and give you an honest recommendation, whether that’s a simple repair or a planned replacement. We’re a licensed, bonded, and insured family-owned company with a 4.9-star rating across 811 reviews, and we don’t push replacements you don’t need.
Emergency plumber cost in Manassas comes down to four things: when you call, how serious the problem is, what parts the repair needs, and how much damage the water is doing while you wait. No honest plumber can quote a firm price for a problem they haven’t seen, but you can, and should, get the price explained before any work begins.
This guide covers how emergency plumbing pricing works, what pushes a bill up, which problems can safely wait until morning, and what to ask so you pay a fair price when something goes wrong late at night.
How Much Does an Emergency Plumber Cost in Manassas?
There isn’t one number. A pinhole leak under a kitchen sink and a burst supply line behind finished drywall are both emergencies, but they are very different jobs with very different bills. Be cautious of anyone who gives you a firm total over the phone before seeing the problem.
Most emergency plumbing bills are built from the same four pieces:
A service or diagnostic charge for sending a licensed plumber to your home and finding the actual cause of the problem.
Labor, which reflects how long the repair takes and how hard the problem is to reach.
Parts and materials, which can range from a single valve or supply line to a full water heater.
Timing, because nights, weekends, and holidays generally cost more than a scheduled weekday visit.
The fair way to handle an emergency is straightforward: the plumber diagnoses the problem, explains what’s wrong in plain language, and gives you the price before starting the repair. That’s the standard Kinnett Plumbing holds itself to, with honest pricing and no upsell pressure.
What Drives the Cost of Emergency Plumbing?
Knowing what moves the price helps you make better decisions in the moment. Here’s what matters most and what you can do about each factor.
What moves an emergency plumbing bill up or down
Cost factor
Why it affects the bill
What you can do
Time of the call
After-hours, weekend, and holiday calls pull a plumber away from a normal schedule.
If you can stop the water and nothing is being damaged, ask whether a first-thing-in-the-morning visit makes sense.
Severity and access
A leak behind a finished wall, under a floor, or in a crawl space takes longer to locate and reach than one under a sink.
Describe exactly what you see and where. Photos help the plumber arrive prepared.
Parts needed
Replacing a supply line or valve costs far less than replacing a water heater or a section of pipe.
Ask whether the fix is a repair or a replacement, and why.
The longer water runs, the bigger the job gets. Drying out and restoring floors or drywall is a separate cost on top of the plumbing repair.
Shut off the water as fast as you can (see the steps below).
Is It a Real Emergency, or Can It Wait Until Morning?
Call right away if water is actively damaging your home or you’ve lost something your household can’t go without, like water service or a working toilet. If the problem is contained and nothing is getting wet, it can usually wait for regular hours, which saves you the after-hours premium.
When to call now vs. when to schedule
Call right away
Usually safe to schedule
A burst pipe or a leak you can’t stop
A dripping faucet
Sewage backing up into a tub, shower, or floor drain
One slow-draining sink or tub
A water heater leaking from the tank
A running toilet (turn off the valve behind it)
No water anywhere in the house
A small leak you’ve stopped with the shutoff valve
Water near outlets, wiring, or electrical panels
Low pressure at a single fixture
If your situation is in the first column, go straight to our emergency plumbing service page or call us.
What to Do While You Wait for the Plumber
A few minutes of quick action can keep a plumbing repair from turning into a much larger restoration project. These steps also make the plumber’s job faster once they arrive.
Shut off the main water valve. It’s usually where the water line enters your home, often in the basement, crawl space, utility room, or near the water heater.
Cut power or gas to a leaking water heater. Turn off the breaker for an electric unit or set a gas unit to “off” or “pilot.”
Move belongings out of the water’s path and keep people and pets away from any area where water is near electrical outlets.
Take photos of the damage before cleanup starts. Your insurance company may ask for them.
Not every water problem ends in a plumbing bill. Much of Prince William County gets water and sewer service from Prince William Water, which did business as the Prince William County Service Authority until July 1, 2024. If you live inside the City of Manassas or Manassas Park, your water and sewer service may come from your city instead, so check the name on your bill.
If water is bubbling up near the street or the meter, or your whole neighborhood loses pressure at once, call your water provider first. The problem may be on the utility’s side, and one phone call could save you a service charge. If the problem is inside your home, that’s when you call a plumber.
How to Make Sure You’re Paying a Fair Price
An emergency is stressful, but it’s still a purchase. These questions protect you with any plumber you call:
Is the plumber licensed in Virginia? Ask for the license number. Kinnett Plumbing is licensed, bonded, and insured, with Virginia DPOR license #2705 088 083 C.
What will the repair cost before you start? Get the price explained up front, not after the work is done.
Can I get an itemized invoice? Parts and labor should be listed separately.
Is there a temporary fix now and a permanent repair later? Stopping the leak tonight and finishing during regular hours can sometimes make sense.
Do you offer any discounts? Kinnett Plumbing offers discounts for military members, teachers, police officers, and firefighters.
What do other homeowners say? Check recent customer reviews. Kinnett Plumbing holds a 4.9-star rating across 811 reviews.
Here’s how one homeowner described a late-night call:
“Called late on a Monday with soaked carpet in my basement from a cracked water heater. Was placed on the schedule immediately, and Dan was at my house within 45 min. He assessed the issue, drained the tank, and capped the hot water line until he could replace the water heater first thing Tuesday morning. While working, he also had a water restoration company contact me to get restoration efforts moving. Service was prompt, empathetic, and thorough.” — Jennifer Bishop
Notice what happened there: the immediate problem was contained that night, and the full replacement was done the next morning. That’s often the most sensible way to handle an after-hours emergency.
Frequently Asked Questions
How much does an emergency plumber cost in Manassas?
It depends on when you call, how serious and hard to reach the problem is, and what parts the repair needs. Most bills include a service or diagnostic charge, labor, and parts. Because every emergency is different, the fairest approach is to have the plumber diagnose the problem and explain the price before any repair work begins.
Why do emergency plumbers charge more after hours?
After-hours, weekend, and holiday calls require a licensed plumber to be available outside a normal schedule and respond quickly with a stocked truck. That availability costs more to provide. If you can shut off the water and nothing is being damaged, waiting for regular hours is usually the less expensive option.
Is it cheaper to wait until morning?
Often, yes, but only when the problem is truly contained. If you’ve shut off the water and there’s no active leak, sewage backup, or water near electrical, a morning appointment usually costs less. If water is still spreading, waiting can cost far more in drying and repairs than the after-hours visit would have.
Does homeowners insurance cover emergency plumbing?
It depends on your policy. Coverage for water damage and coverage for the plumbing repair itself can be treated differently, so call your insurance company to ask. Either way, take photos of the damage before cleanup, keep your itemized invoice, and document when the problem started.
What should I ask before an emergency plumber starts work?
Ask for the plumber’s Virginia license number, what’s causing the problem, what the repair will cost, and whether a temporary fix now and a permanent repair later is an option. Ask for an itemized invoice that separates parts from labor, and ask whether any discounts apply to your household.
Need an Emergency Plumber in Manassas?
When something goes wrong, you want a straight answer and a fair price. Kinnett Plumbing is a family-owned, licensed plumbing company based in Manassas, serving homeowners across Northern Virginia. We’ll tell you what’s wrong, what it will take to fix it, and what it will cost before we start.
If you are considering tankless water heater installation in Virginia, you are probably looking for a more efficient way to keep hot water flowing without dedicating a large chunk of your utility room, basement, or garage to a traditional storage tank. Tankless water heaters can be an excellent option for Virginia homeowners, but installing one is not quite as simple as taking the old tank out and putting a smaller unit in its place. There are fuel connections, plumbing lines, electrical requirements, ventilation considerations, and local codes to think about. The good news is that you do not have to be a plumbing expert to understand how the process works. Think of this guide like a friendly shop class. We will walk through each major step, explain what matters, and help you know what to expect when a professional plumber handles the installation.
How Does a Tankless Water Heater Work?
Before getting into the installation process, it helps to understand what makes a tankless system different.
A traditional water heater stores a large amount of heated water inside a tank. The heater regularly turns on to keep that water warm, even when no one is using it.
A tankless water heater works differently. Instead of storing hot water, it heats water as you need it. When you turn on a hot water faucet, cold water travels through the unit. A gas burner or electric heating element quickly warms the water before sending it to your faucet, shower, dishwasher, or washing machine.
When you turn the water off, the unit stops heating.
That on-demand design provides several potential benefits, including:
Less space required for the water heater
Reduced standby energy loss
A longer potential service life compared with many tank-style systems
A continuous supply of hot water when the unit is properly sized
Improved energy efficiency in many households
Less risk of a large storage tank leaking dozens of gallons of water
However, getting those benefits starts with choosing and installing the right unit.
Step 1: Determine Whether a Tankless Water Heater Is Right for Your Home
The first step is not buying the heater. It is determining whether your house can support one.
A plumber will usually look at your existing plumbing system, household hot water usage, fuel source, available electrical service, ventilation options, and the location of the current water heater.
One of the biggest considerations is how much hot water your household uses at the same time.
For example, imagine someone is taking a shower while the dishwasher is running and another person turns on a bathroom sink. Your tankless water heater needs enough capacity to heat the combined flow of all those fixtures.
That is why tankless water heaters are typically sized based on flow rate rather than simply the number of gallons they hold.
A professional plumber can calculate the approximate gallons per minute your home requires and recommend a unit capable of keeping up.
Step 2: Choose the Correct Tankless Water Heater Size
Choosing the right size is one of the most important parts of the installation.
A unit that is too small may struggle when several people need hot water at the same time. You might notice the shower temperature dropping when someone starts the washing machine or turns on another faucet.
An oversized unit can create unnecessary upfront costs.
Your plumber will generally consider:
Number of people living in the home
Number of bathrooms
Number of showers or tubs
Dishwasher usage
Washing machine usage
Typical simultaneous hot water demand
Incoming groundwater temperature
Desired hot water temperature
Groundwater temperature matters more than many homeowners realize.
The colder the incoming water is, the harder the heater must work to bring it up to the desired temperature. Virginia experiences seasonal temperature changes, which means sizing should account for colder conditions rather than only warm summer weather.
Step 3: Evaluate Gas, Electric, and Utility Requirements
Next comes the part where professional experience becomes especially important.
Tankless water heaters may use natural gas, propane, or electricity. Each type has specific installation requirements.
Gas Tankless Water Heaters
Gas-powered tankless systems can require a substantial amount of fuel when operating.
The existing gas line that supplied your traditional water heater may not always be large enough for a tankless model. A plumber may need to evaluate:
Gas line diameter
Gas pressure
Distance from the gas supply
Other gas appliances in the home
Total fuel demand
If the gas supply cannot support the new heater, the line may need to be modified or upgraded.
Electric Tankless Water Heaters
Electric models can require considerable electrical capacity.
Depending on the heater, the home may need dedicated circuits or electrical panel upgrades. A licensed professional can determine whether your existing electrical system is capable of safely supporting the unit.
This is not an area for guesswork. Water and high electrical loads are a combination that should always be handled carefully.
Step 4: Select the Installation Location
One of the nicest features of tankless water heaters is their compact size.
Because there is no large storage tank, the unit can often be mounted directly to a wall. Depending on the model and your home’s layout, installation locations may include:
Utility rooms
Basements
Garages
Mechanical rooms
Interior utility closets
Certain exterior locations when approved equipment is used
The installer will also need adequate access for maintenance.
It might be tempting to squeeze the heater into the smallest possible corner, but future service needs to be considered. Technicians should be able to reach connections, valves, filters, and other components without taking half the room apart.
Step 5: Shut Down and Remove the Existing Water Heater
Once the new system has been selected and the installation plan is ready, the old water heater needs to be disconnected.
The process generally begins by shutting off:
Water supply
Gas supply, when applicable
Electrical power
Relevant plumbing connections
A traditional tank must also be drained before it can be removed.
Even an old heater can contain many gallons of water, so proper draining is important. Simply disconnecting the plumbing without emptying the tank could create quite a mess.
The old heater is then removed from the installation area so the space can be prepared for the new unit.
Step 6: Prepare the Plumbing Connections
Here is where the system starts coming together.
The plumber will connect the home’s cold water supply to the tankless heater and connect the heater’s hot water outlet to the home’s hot water distribution lines.
Installers may also add service valves.
These valves are especially helpful because they make routine maintenance easier. A technician can isolate the heater from the rest of the plumbing system when flushing or servicing it.
Depending on the installation, additional components may include:
Shutoff valves
Pressure relief components
Drain connections
Pipe insulation
Water filtration equipment
Condensate drainage for certain high-efficiency units
The exact setup depends on the heater and the existing plumbing system.
Step 7: Install Gas or Electrical Connections
After the water lines are prepared, the heater needs its energy source.
For a gas system, the plumber will connect the appropriate gas supply and verify that the connection is secure. Proper gas pressure and pipe sizing are important for safe and reliable operation.
Electric systems require the proper circuits and electrical connections based on manufacturer requirements.
Homeowners should avoid treating this part of the project as a casual DIY job. Incorrect gas or electrical work can create serious safety hazards and may violate local building requirements.
Professional installation helps ensure the system is connected properly from the beginning.
Step 8: Install the Venting System
Gas tankless water heaters produce combustion gases that need to be safely directed outside.
That means proper ventilation is essential.
The type of venting required depends on the heater. Some models use specialized exhaust systems, while high-efficiency condensing units may have different venting requirements.
The vent location also matters.
Exhaust cannot simply be routed anywhere that seems convenient. Proper clearances may be required around windows, doors, air intakes, property features, and other openings.
A qualified installer will follow the manufacturer’s instructions and applicable local requirements when designing the vent system.
Step 9: Address Condensate Drainage When Necessary
Some modern tankless water heaters are condensing models.
These units capture additional heat from exhaust gases, which improves efficiency. During that process, however, they produce condensation.
That moisture needs somewhere to go.
The installer may need to connect the unit to an approved drainage location. In some situations, a condensate neutralizer may also be used.
It is a small detail, but it is an important one. Poor condensate drainage can eventually create moisture problems or damage components around the heater.
Step 10: Turn On the Water and Check for Leaks
Once the major connections are complete, the system is filled with water.
The plumber will carefully inspect fittings and connections for leaks.
Even a tiny drip deserves attention.
A connection that leaks only a drop every few minutes can eventually cause:
Water damage
Mold growth
Corrosion
Cabinet or drywall damage
Higher water bills
Professional installers check the system before considering the job finished.
Step 11: Start the Heater and Test Its Performance
Now comes the satisfying part.
The tankless heater is powered on and tested.
The plumber may open several hot water fixtures to confirm that the system activates properly and produces the expected water temperature.
During testing, the installer may check:
Water temperature
Flow rate
Burner operation
Gas pressure
Electrical performance
Vent operation
Error codes
Water connections
Drainage
Adjustments can then be made if necessary.
Step 12: Set the Water Temperature
Tankless systems typically allow homeowners to select the desired hot water temperature.
Higher is not always better.
Water that is excessively hot can increase the risk of scalding, especially for children, older adults, and anyone with reduced skin sensitivity.
Your plumber can help you choose an appropriate temperature based on your household.
Once everything is set, ask the installer how to adjust the temperature safely if you ever need to change it later.
Do Tankless Water Heaters Need Maintenance?
Yes.
Tankless does not mean maintenance-free.
Minerals naturally found in water can gradually collect inside the heat exchanger. Over time, that buildup may reduce efficiency or affect performance.
Routine flushing helps remove mineral deposits.
The appropriate maintenance schedule depends on factors such as:
Water hardness
Household water usage
Manufacturer recommendations
Heater design
Previous maintenance history
A plumber may also inspect filters, vents, burners, electrical connections, drainage components, and valves during routine service.
Keeping up with maintenance can help your heater operate efficiently and may reduce the chance of unexpected problems.
Signs Something May Be Wrong After Installation
A properly installed tankless water heater should provide consistent performance, but problems can occasionally develop.
Call a plumber if you notice:
Water suddenly becoming cold during use
Unusual noises from the heater
Error codes on the display
Water leaking around the unit
Weak hot water pressure
The heater repeatedly shutting down
Unusual odors
Visible corrosion
Significant temperature fluctuations
You should also take gas odors seriously.
If you suspect a gas leak, leave the area and follow appropriate emergency procedures rather than trying to inspect the heater yourself.
Why Professional Installation Is Worth It
There are plenty of household projects that make excellent weekend DIY jobs.
Tankless water heater installation generally is not one of them.
Installing the unit correctly may involve water plumbing, gas lines, electrical systems, ventilation, drainage, permits, and local building requirements. A mistake can affect far more than whether your shower gets warm.
Professional installation can help protect your home and ensure that the heater performs the way it was designed to perform.
It also gives you someone knowledgeable to answer practical questions such as:
What temperature should I use?
How often should the heater be flushed?
Where is the shutoff valve?
What does this error code mean?
What should I do if the heater stops working?
Which maintenance tasks should I schedule?
That kind of guidance can be especially valuable when you are switching from a traditional tank-style heater for the first time.
Frequently Asked Questions About Tankless Water Heater Installation
How long does a tankless water heater installation take?
Installation time varies depending on the home’s plumbing, fuel supply, venting needs, and whether the project involves replacing a traditional tank heater. More complicated conversions may take longer than a straightforward replacement.
Can a tankless water heater provide enough hot water for an entire house?
Yes, if the system is properly sized. The heater must be capable of handling your household’s maximum expected hot water demand.
Can I install a tankless water heater myself?
Professional installation is strongly recommended because the work may involve plumbing, gas, electrical, ventilation, and local code requirements.
Do tankless water heaters run out of hot water?
They do not store a limited tank of hot water. However, every unit has a maximum heating and flow capacity. If demand exceeds that capacity, performance can decrease.
Does a tankless water heater need to be flushed?
Usually, yes. Periodic flushing helps remove mineral deposits that can build up inside the system.
Can I replace my traditional water heater with a tankless model?
In many homes, yes. The conversion may require changes to gas lines, electrical service, plumbing, or venting, so the home should be evaluated first.
Are tankless water heaters more energy efficient?
They can reduce standby energy losses because they do not continuously keep a large tank of water hot. Actual energy use depends on the unit, household habits, fuel source, and installation.
Where can a tankless water heater be installed?
Possible locations include utility rooms, garages, basements, mechanical spaces, and other approved areas. The location must meet access, ventilation, plumbing, and manufacturer requirements.
What happens if my tankless water heater stops working?
Start by checking the unit for an error code or obvious power issue. If the problem is not immediately clear, contact a professional plumber rather than opening or attempting to repair the unit yourself.
Call Kinnett Plumbing for Tankless Water Heater Installation and Emergency Plumbing Service
A tankless water heater can be a smart improvement for your Virginia home, but the quality of the installation matters just as much as the heater you choose. Proper sizing, secure plumbing connections, correct ventilation, adequate fuel or electrical capacity, and professional testing all contribute to reliable performance.
Kinnett Plumbing is here to help homeowners in Woodbridge, VA, and surrounding areas handle water heater needs and unexpected plumbing problems with confidence. Our experienced team can diagnose plumbing issues, recommend practical solutions, and provide high-quality repairs with honest pricing.
Plumbing problems also have a habit of showing up at inconvenient times. A burst pipe, overflowing toilet, leaking plumbing fixture, or failing water heater can quickly create damage if it is not addressed. That is why our team is available 24/7 for emergency plumbing repairs. We arrive prepared to identify the problem and complete necessary repairs as efficiently as possible so you can get your home or business back to normal.
Whether you are planning a tankless water heater upgrade or dealing with a plumbing emergency right now, contact us for dependable service in Woodbridge and the surrounding Virginia communities.
A member of our team will be in touch shortly to confirm your contact details or address questions you may have.
[contact-form-7 id="104" title="Contact form 1"]
Proudly Serving Manassas, VA and Surrounding Areas

 Rated 4.9 (974) Reviews







 Jennifer Bishop