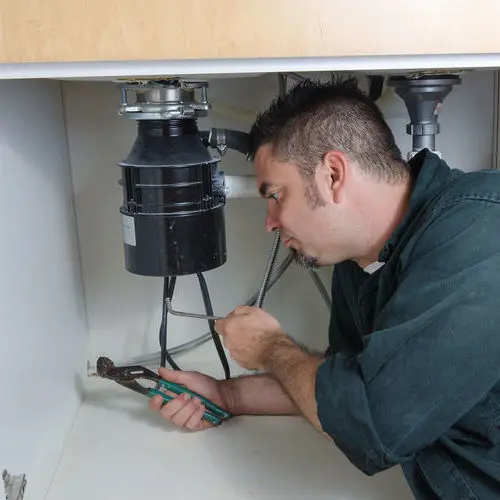
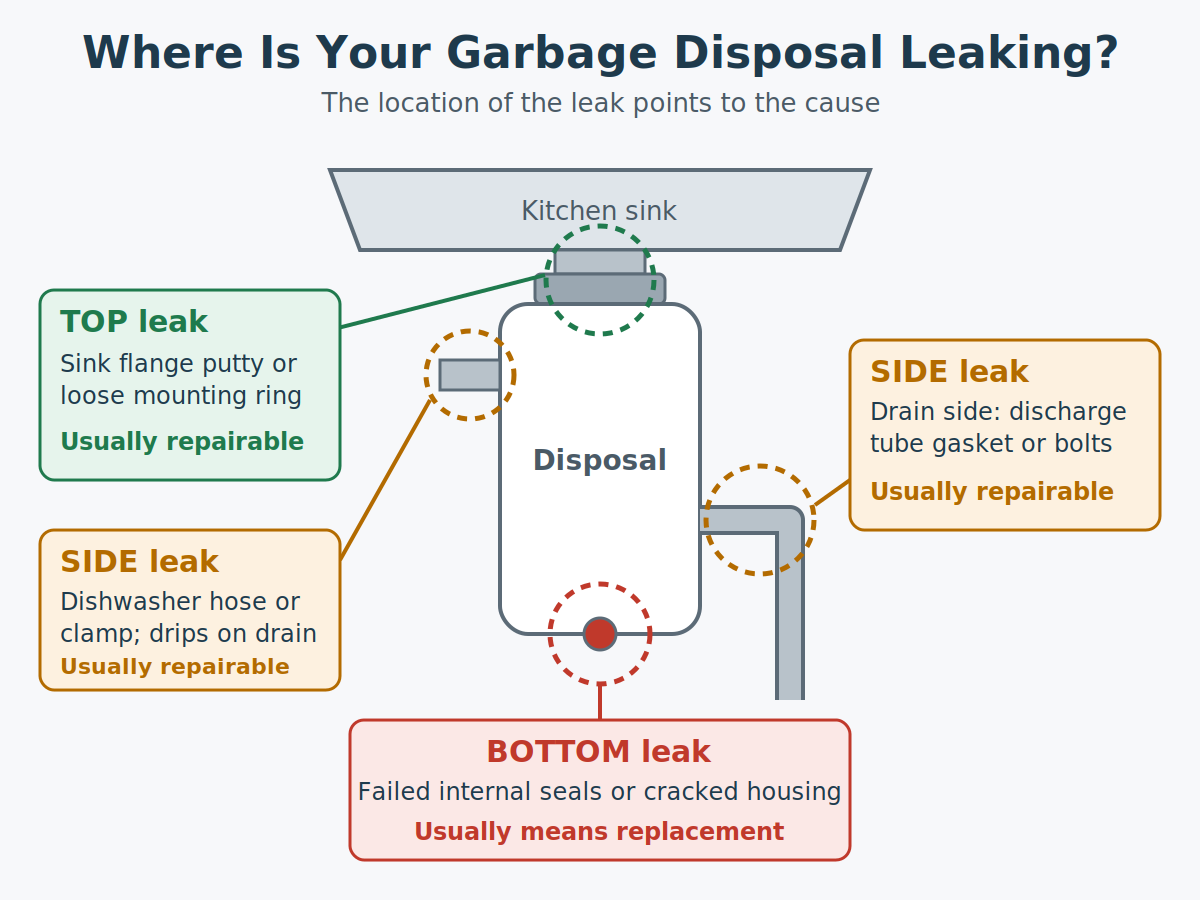
Why is my garbage disposal leaking? Where the water shows up tells you. A leak at the top usually means the plumber’s putty at the sink flange has failed or the mounting assembly has loosened. A leak on the side points to the dishwasher hose or the discharge tube. A leak from the bottom usually means the internal seals have worn out, and the unit needs to be replaced.
Most top and side leaks are fixable with basic tools. Before you start, turn off the disposal at the wall switch and at the circuit breaker, or unplug it if it’s plugged into an outlet under the sink.
How to Find Where Your Garbage Disposal Is Leaking
Water travels. A drip from the top of the disposal can run down the side and fall off the bottom, which makes a simple fix look like a dead unit. Take five minutes to find the true source first.
Dry everything. Wipe down the disposal, the pipes, the dishwasher hose, and the cabinet floor with paper towels until nothing is damp.
Grab a flashlight. You’ll want to see the top, both sides, and the bottom of the unit clearly.
Run cold water into the sink for 30 to 60 seconds and watch for the first sign of moisture.
Turn the disposal on with the water running. Some leaks only appear when the unit is vibrating.
Run the dishwasher’s drain cycle if nothing has shown up yet. Leaks at the dishwasher connection only appear when the dishwasher pumps water through it.
Note where water appears first. That spot is your answer.
Also check above the disposal. A leak at the base of the faucet or at the sink’s supply lines can drip down onto the disposal and look like a disposal leak. If that’s the source, you need a faucet repair, not a new disposal.
Why Is My Garbage Disposal Leaking? Match the Leak to the Cause
Garbage disposal leak location, likely cause, and fix
Where the leak appears
Likely cause
Usual fix
Top, where the disposal meets the sink
Dried or cracked plumber’s putty at the sink flange
Remove the flange, clean it, and reseal with fresh putty (DIY-friendly)
Top, with a disposal that wobbles
Loose mounting assembly
Tighten the mounting ring and screws (DIY-friendly)
Side, only when the dishwasher drains
Loose clamp or worn dishwasher drain hose
Tighten or replace the clamp or hose (DIY-friendly)
Side, at the pipe running to the drain
Worn gasket or loose bolts on the discharge tube
Replace the gasket and tighten the connection (DIY-friendly)
Bottom, often near the reset button
Failed internal seals or a cracked housing
Replace the disposal
Where a garbage disposal leaks tells you what failed: top and side leaks are usually repairable, while bottom leaks usually mean replacement.
1. Worn Plumber’s Putty at the Sink Flange
The sink flange is the metal collar that sits in the sink’s drain opening. A ring of plumber’s putty seals it to the sink. Over years, that putty dries out, shrinks, and cracks, and water starts seeping between the flange and the sink before dripping onto the top of the disposal.
To reseal it:
Turn off power to the disposal at the breaker.
Disconnect the dishwasher hose and discharge tube, then remove the disposal from the mounting ring. Support the unit from below, since disposals are heavier than they look.
Loosen the mounting assembly and push the flange up and out of the sink.
Scrape all the old putty off the flange and the sink opening, then clean both surfaces.
Roll a fresh, even rope of plumber’s putty, press it around the underside of the flange lip, and set the flange back in the drain.
Reinstall the mounting assembly, tighten it evenly, wipe away the excess putty, and remount the disposal.
Reconnect the hoses, restore power, and run water to check for leaks.
2. A Loose Mounting Assembly
The disposal hangs from a mounting assembly that clamps to the flange. Years of vibration can loosen it enough to break the seal even when the putty is fine. If the disposal wobbles when you push on it, tighten the mounting assembly first. It takes a few minutes and sometimes solves the leak on its own. If the drip returns, reseal the flange.
3. The Dishwasher Hose Connection
If your dishwasher drains through the disposal, its drain hose connects to a small inlet on the side of the unit with a hose clamp. That clamp can loosen or corrode, and the hose can crack with age. Because the leak only appears when the dishwasher drains, it’s easy to miss.
Tighten the clamp with a screwdriver. If the clamp is rusted or the end of the hose is cracked, replace them. Hose clamps are inexpensive and widely available.
4. The Discharge Tube Gasket
The discharge tube is the bent pipe that carries ground-up waste from the disposal to the drain line. It connects to the disposal with a rubber gasket and a flange held by bolts. The gasket hardens over time, and vibration loosens the bolts.
Tighten the bolts first. If the leak continues, remove the tube, replace the gasket with one that fits your model, and reinstall it. Also check the slip nut where the tube meets the P-trap. If the leak is farther down the drain line, or the drain backs up when you run the disposal, the problem may be in the pipe itself, and professional drain cleaning may be the fix.
5. Failed Internal Seals or a Cracked Housing
A leak from the very bottom of the disposal, often around the reset button, is different from the others. It doesn’t come from a connection. It comes from inside the unit, where seals keep water in the grinding chamber away from the motor. When those seals wear out, or the housing cracks, water escapes out the bottom.
This is the one leak that almost always means replacement. The internal seals generally aren’t sold as consumer repair parts, and the labor to take the motor apart would typically cost more than a new disposal. Stop using the unit, keep the power off, and plan a replacement. Water leaking near a motor and wiring is not something to keep running.
How to Prevent Garbage Disposal Leaks
A few habits help your disposal and its seals last longer:
Keep grease and oil out of the drain. They coat the unit and the pipes and contribute to clogs.
Don’t overload it. Feed food in gradually with the water running instead of packing the chamber first.
Don’t overtighten fittings. Plastic fittings and the housing can crack under too much force.
Look under the sink every month or so. Catching a slow drip early protects the cabinet.
If you do find water, dry the cabinet out quickly. The U.S. Environmental Protection Agency’s guidance is to respond to clean water damage within 24 to 48 hours to help prevent mold growth, which matters in a closed sink cabinet.
When to Call a Plumber
Call a licensed plumber when:
The leak is coming from the bottom of the unit
Water is near the disposal’s wiring or the outlet under the sink
You’ve tightened and resealed the connections, and it still leaks
The disposal body is visibly cracked
The cabinet floor is soft, swollen, or stained from a long-term leak
Kinnett Plumbing’s garbage disposal repair service starts with finding the real source. If a new gasket or fresh putty will fix it, that’s what we’ll recommend. We’ll only suggest a replacement when the unit actually needs one.
Frequently Asked Questions
Can a garbage disposal leaking from the bottom be fixed?
Usually not. A leak from the bottom almost always means the internal seals have failed or the housing has cracked. Those seals generally aren’t sold as repair parts, and taking the motor apart typically costs more than a new unit. Before you give up on it, dry the unit and retest to confirm the water isn’t dripping down from the top or side.
Why does my garbage disposal only leak when the dishwasher runs?
That pattern points to the dishwasher drain connection on the side of the disposal. The clamp holding the dishwasher hose may be loose or corroded, or the hose may be cracked near its end. Tighten the clamp first, then replace the clamp or hose if the leak continues. Watch the connection during a drain cycle to confirm it.
Is it safe to use a leaking garbage disposal?
It’s best to stop using it until you find the source. A leak at the sink flange or a side connection isn’t dangerous on its own, but it will keep damaging the cabinet. A bottom leak means water is getting near the motor and wiring, so keep the power off and plan a replacement.
Should I use hot or cold water with a garbage disposal?
Use cold water. Disposal manufacturers recommend a steady stream of cool or cold water while the unit runs, because it keeps fats solid so they move through the drain instead of coating the unit and pipes. Keep the water running for a few seconds after grinding stops to flush the drain line.
Get Your Kitchen Sink Back to Normal
Most garbage disposal leaks are small fixes. When they aren’t, you want a plumber who will tell you straight. Kinnett Plumbing is a licensed, family-owned plumbing company based in Manassas, with a 4.9-star rating across 811 reviews from Northern Virginia homeowners.
Fall sump pump maintenance comes down to a few checks before storm season: clear leaves away from the discharge outlet, clean the pit and intake screen, bucket-test the float switch, test the battery backup with the main pump unplugged, and make sure the check valve and power supply are sound. Plan on about an hour, and finish before the first big fall storm.
This is the fall-specific version of our routine. For the full year-round schedule, see our sump pump maintenance checklist.
Why Fall Is Hard on Northern Virginia Sump Pumps
Fall asks more of a sump pump than almost any other season. Several things tend to pile up at once:
Heavy rain from late-season storms. The Atlantic hurricane season runs through November 30, and the remnants of tropical systems can bring several days of soaking rain to the region.
Falling leaves. Wet leaves collect around the outdoor end of the discharge pipe and can block it within a single windy week.
Power outages. The same storms that fill your sump pit can knock out power, which is exactly when a standard pump stops working.
A pump that’s been sitting idle. After a dry stretch in late summer, a pump may not have run in weeks, and a stuck float or seized impeller won’t show itself until the pit fills.
Your Fall Sump Pump Maintenance Checklist
Work through these steps in order. Always cut power to the pump before you put your hands in the pit.
Start outside at the discharge outlet. Clear leaves, mulch, and debris from the end of the pipe, and confirm the water will drain away from your foundation, not back toward it.
Unplug the pump or switch off its circuit before touching anything in the pit.
Clean the pit and intake screen. Lift the pump out if you can, scoop out silt and gravel from the bottom of the basin, and brush off the intake screen.
Check that the float moves freely. Make sure the float can rise and fall without catching on the pit wall, the power cord, or the discharge pipe.
Listen when the pump shuts off. A rush of water flowing back into the pit points to a failing check valve.
Test the battery backup using the steps in the section below.
Check the power supply. Look over the cord for damage, plug the pump directly into its outlet rather than an extension cord, and confirm the circuit breaker is on.
How to Clear a Clogged Sump Pump Discharge Line
A blocked discharge line is one of the most common reasons a pump fails during a storm. With nowhere for the water to go, the pump runs against the blockage, overheats, and can burn out.
Walk the line from where it leaves your foundation to where it ends in the yard. Clear the outlet, and check any extension pipe or buried line for crushed sections. If water backs up in the pipe or the pump runs without moving water even after you’ve cleared the outlet, the clog may be inside the line. That’s a good time to call a plumber, since forcing a buried line can damage it.
A battery backup is your protection when a storm takes out the power. According to NDSU Extension, a typical backup system uses a 12-volt DC pump powered by a battery on a specially designed trickle charger, with its own check valve on the outlet pipe and a float set to turn on only when water rises above the primary pump’s turn-on level.
To test it:
Confirm the battery is fully charged using the indicator on the control unit.
Shut off power to the main sump pump and to the backup system’s charger.
Pour water into the pit until the backup pump turns on.
Watch that it empties the pit and shuts off on its own.
Restore power to both the main pump and the charger.
If you don’t have a backup yet, fall is a good time to add one. Kinnett Plumbing installs backup and battery-powered sump pumps as part of our sump pump installation and repair services.
What Your Sump Pump Is Telling You
If something didn’t look or sound right during your checks, use this table to narrow it down.
Common sump pump symptoms and what they usually mean
Symptom
What it usually means
What to do
Hums but doesn’t pump
Jammed impeller, clogged intake screen, or blocked discharge line
Unplug it, clear the intake and outlet, and retest. Call a plumber if it still hums.
Turns on and off constantly
Water flowing back through a failed check valve, or a float set too tight
Listen for backflow when it shuts off. A worn check valve should be replaced.
Runs without stopping
Stuck float switch, or water coming in faster than the pump can remove it
Check that the float moves freely. If it does, the pump may be undersized.
Won’t turn on at all
Tripped breaker, unplugged cord, stuck float, or a failed motor
Check power first, then the float. A dead motor means replacement.
Water keeps rising toward the top of the pit
The pump can’t keep up with the inflow
A larger pump or a backup may be needed. Call for an assessment.
Backup system alarm is sounding
Low battery or a charger problem
Check the control unit and battery per the manufacturer’s instructions.
Water pooling near a basement bathroom or laundry area instead of the sump pit may be a different system. An ejector pump handles wastewater from below-grade fixtures and needs its own ejector pump service.
When to Call a Plumber
Routine fall checks are a homeowner job. Call a licensed plumber when:
The pump fails the bucket test or the battery backup test
You’ve cleared the outlet, but the discharge line still seems blocked
The check valve is letting water flow back into the pit
You don’t know how old the pump is, and it’s never been professionally checked
You want to add a battery backup before the next outage
If your pump fails in the middle of a storm and water is rising, contact our emergency plumbing team.
Frequently Asked Questions
When should I do fall sump pump maintenance?
Aim for September or early October, before leaves start dropping heavily and before the late-season storms that often reach Northern Virginia. Test again after any long power outage, and give the pump another check in late winter before spring rains. If your pump runs often, check it more frequently.
Why is my sump pump humming but not pumping water?
A hum usually means the motor is getting power but can’t move water. Common causes are a jammed impeller, a clogged intake screen, a stuck float, or a blocked or frozen discharge line. Unplug the pump right away to protect the motor, clear what you safely can, and call a plumber if it still won’t pump.
Does a battery backup sump pump need its own check valve?
In a typical setup, yes. NDSU Extension describes backup systems with their own check valve on the backup pump’s outlet pipe, which then connects to the primary pump’s discharge line. Without it, water pushed out by one pump can flow back into the pit through the other. A plumber can confirm your setup is plumbed correctly.
What should I do if my sump pump fails during a storm?
Stay out of standing water if the pump or any outlet may be energized. If you can reach the breaker safely, cut power to the pump. Move belongings to higher ground, and start removing water with a wet vacuum or a portable pump if you have one. Then call a plumber for emergency service.
Get Your Sump Pump Ready Before the Storms
A few minutes now is a lot easier than a flooded basement later. If your pump didn’t pass one of the checks above, or you’d like a battery backup installed before storm season, Kinnett Plumbing can help. We’re a licensed, family-owned plumbing company based in Manassas, and we’ll give you an honest assessment of what your system needs and what it doesn’t.
If you have ever pictured a sewer repair as a crew digging a long trench straight through your lawn, driveway, flower beds, or landscaping, you are not alone. That used to be the standard approach for many sewer line problems. Today, homeowners have another option. Trenchless sewer repair in Virginia can often repair or replace a damaged underground sewer line with far less digging, less disruption, and a much easier cleanup afterward.
For homeowners in Northern Virginia, that can be a big deal. Many properties have mature landscaping, carefully maintained lawns, patios, sidewalks, driveways, fences, and other features sitting above underground plumbing lines. Digging all of that up just to reach a damaged sewer pipe can turn one repair project into several.
Trenchless technology is designed to reduce that disruption. It is not the right solution for every single sewer problem, but when conditions allow it, it can save time, preserve your property, and help you avoid some of the extra expenses that come with traditional excavation.
Let’s break down how it works, when it makes sense, and what Northern Virginia homeowners should know before choosing a sewer repair method.
What Is Trenchless Sewer Repair?
The easiest way to understand trenchless sewer repair is to think of it as fixing an underground pipe without digging up the entire length of that pipe.
Traditional sewer repair usually involves excavating a trench along the damaged sewer line. That gives plumbers direct access to the pipe so they can remove damaged sections and install new ones.
Trenchless methods take a different approach. Instead of opening the whole area above the sewer line, plumbers typically work through one or two smaller access points. Specialized equipment is then used to rehabilitate or replace the pipe underground.
In plain English, the goal is to do as much of the work as possible below the surface while leaving your yard alone.
That can make trenchless repair especially appealing when a sewer line runs under:
A driveway
A patio
Expensive landscaping
A garden
A walkway
Mature trees or shrubs
Fencing
Outdoor living areas
Less digging does not mean no work is involved. Sewer repair is still a serious plumbing project. The advantage is that the repair can often be completed without tearing apart everything sitting above the damaged line.
How Does Trenchless Sewer Repair Work?
There are a few different trenchless methods, but two of the most common are pipe lining and pipe bursting.
Pipe Lining
Pipe lining is often used when the existing sewer pipe is damaged but still structurally suitable for rehabilitation.
A plumber first cleans and inspects the existing line. A flexible liner coated with resin is then inserted into the damaged pipe. Once it is positioned correctly, the liner is expanded and allowed to cure.
After curing, the liner essentially creates a new pipe inside the old one.
Think of it like putting a durable new inner shell inside an existing pipe instead of removing the entire pipe from the ground.
Pipe lining may be useful for problems such as:
Cracks
Small gaps
Corrosion
Certain types of leaks
Aging pipe walls
Minor root intrusion after the line has been properly cleaned
Because the new liner sits inside the old sewer pipe, the interior diameter of the line may be reduced slightly. However, the smooth interior surface can still provide efficient wastewater flow when the system is properly installed.
Pipe Bursting
Pipe bursting is different because it actually replaces the existing sewer pipe.
A specialized bursting head is pulled through the old pipe. As it moves forward, it breaks or pushes the damaged pipe outward while pulling a new pipe into the same path.
The old line is essentially moved out of the way while the replacement pipe takes its place.
This method can be useful when the existing sewer line is too badly damaged for lining.
Depending on the condition and layout of the plumbing system, pipe bursting may be considered for:
Severely deteriorated sewer lines
Collapsed or badly damaged sections
Pipes that need full replacement
Older materials that are reaching the end of their useful life
Situations where installing a completely new pipe is more practical than rehabilitating the existing one
The exact repair method should always be selected after the sewer line has been inspected.
Why Northern Virginia Homeowners Consider Trenchless Repair
Digging up a sewer line is not just about digging up dirt.
That is an important point.
Imagine your sewer line runs beneath 50 feet of lawn and then crosses under part of your driveway. A traditional excavation may solve the plumbing problem, but afterward you could also be dealing with lawn repair, landscaping replacement, concrete work, or driveway repairs.
Those additional projects can add time, inconvenience, and expense.
Trenchless sewer repair can reduce those secondary headaches.
You Can Protect Your Landscaping
Homeowners put a lot of work into their yards. Trees, flower beds, shrubs, irrigation systems, and carefully planned landscaping can take years to establish.
When traditional excavation is required, some of those areas may need to be removed or disturbed to access the sewer line.
A trenchless method usually requires much smaller access areas.
That means fewer plants are disturbed, and less of your lawn needs to be restored afterward.
You May Avoid Major Driveway or Patio Damage
Concrete is another concern.
If a sewer pipe passes beneath a driveway, sidewalk, or patio, traditional excavation may require removing sections of that surface.
Once the plumbing work is finished, the concrete or pavement still has to be repaired.
Trenchless technology can sometimes allow plumbers to reach and repair the sewer line without opening the entire surface above it.
That can prevent a sewer job from turning into a sewer job plus a concrete job.
The Project Can Be Less Disruptive
Sewer repairs are inconvenient enough without turning your property into a construction zone.
Large excavation projects may involve:
Heavy equipment
Large piles of soil
Open trenches
Damaged grass
Restricted access to parts of the property
Cleanup and restoration work
Trenchless repair reduces the amount of excavation required, which can make the overall experience much more manageable for homeowners.
Can Trenchless Sewer Repair Save Money?
Sometimes homeowners hear the word “trenchless” and assume it must automatically be cheaper.
That is not always the case.
The plumbing work itself may involve specialized equipment, materials, and training. Depending on the specific situation, the upfront repair cost could be comparable to or even higher than a traditional excavation.
The potential savings often appear when you look at the entire project instead of only the plumbing invoice.
Traditional sewer replacement may require additional spending on:
Landscaping restoration
Sod replacement
Concrete repair
Driveway repair
Patio reconstruction
Fence removal and replacement
Irrigation system repairs
Those costs can add up quickly.
For example, imagine two sewer repair options are available. One requires digging through a landscaped side yard and part of a paved area. The other requires two small access points.
Even if the trenchless plumbing work costs more initially, avoiding extensive property restoration could make it the more economical choice overall.
This is why it is smart to compare the total project cost rather than simply looking at the sewer repair price by itself.
Signs Your Sewer Line May Need Repair
Sewer problems usually give you some warning signs before everything completely stops working.
Some are obvious. Others are easy to dismiss at first.
Pay attention if you notice any of the following.
Multiple Drains Are Backing Up
One slow sink might be a local clog.
Several drains backing up at the same time can point to a deeper problem in the main sewer line.
You might notice water backing up into a bathtub when a toilet is flushed or hear drains gurgling throughout the house.
Those are signs that wastewater may not be moving through the main line correctly.
Your Toilet Keeps Gurgling
An occasional plumbing noise may not mean much.
Repeated bubbling or gurgling from toilets can indicate air being pushed through the plumbing system because wastewater is having trouble flowing through the sewer line.
If the noise happens when you run a sink, washing machine, or shower, it deserves attention.
You Smell Sewage
A functioning plumbing system should keep sewer gases safely contained.
If you begin smelling sewage inside or outside your home, something may be wrong.
Possible causes include drain problems, venting problems, damaged seals, or a sewer line issue.
Because sewer odors can indicate several plumbing problems, a professional inspection is the best way to identify the source.
Your Yard Has Unusually Wet Areas
A leaking underground sewer line can release wastewater into the surrounding soil.
You may notice soggy areas that do not seem related to rain or irrigation.
In some cases, grass over the leaking area may grow unusually fast because of the extra moisture and nutrients in the soil.
A suspiciously green patch of lawn is not always good news.
You Have Recurring Sewer Clogs
A drain that clogs once may simply need cleaning.
A sewer line that keeps clogging after repeated service could have another problem.
Tree roots, damaged pipe sections, corrosion, shifting soil, or a partially collapsed line can all contribute to recurring blockages.
At that point, repeatedly clearing the clog may only treat the symptom.
Finding out why the line keeps clogging is more important.
Why a Sewer Camera Inspection Matters
You would not want someone replacing part of your car engine without first finding out what is actually wrong.
The same idea applies to sewer lines.
A sewer camera inspection allows a plumber to look inside the pipe before recommending a major repair.
A small waterproof camera is fed through the sewer line while the technician watches the interior condition on a monitor.
The camera may reveal:
Cracks
Root intrusion
Corrosion
Misaligned pipe sections
Heavy buildup
Collapsed areas
Broken connections
Foreign objects
Sections holding standing water
This information helps determine whether the pipe needs cleaning, spot repair, trenchless rehabilitation, full replacement, or another solution.
It also helps determine whether trenchless repair is actually possible.
That is important because trenchless technology should not be treated as a one-size-fits-all answer.
When Trenchless Sewer Repair May Not Be the Right Choice
Trenchless repair is useful, but there are situations where traditional excavation may still be necessary.
For example, the existing pipe may be severely collapsed or positioned in a way that prevents certain equipment from passing through it.
Other complications may include:
Major changes in pipe alignment
Serious structural failure
Poor access
Improper slope
Unexpected underground obstacles
Extensive damage to surrounding connections
The plumbing system may also have defects that cannot be corrected by simply installing a liner inside the existing pipe.
That is why inspection comes first.
A qualified plumber should evaluate the actual sewer line and explain which repair options are practical for your property.
How Long Does Trenchless Sewer Repair Take?
The timeline depends on the condition of the sewer line, its length, the repair method, access, and other site conditions.
In many situations, trenchless work can be completed faster than a full excavation because crews do not have to dig and refill a long trench.
There may also be less restoration work afterward.
A traditional project could involve repairing the sewer line and then scheduling landscaping, concrete, or pavement work.
With a trenchless approach, much of that additional restoration may be reduced or avoided.
Your plumber should explain the expected timeline once the sewer line has been inspected.
What Happens Before the Repair?
A professional trenchless sewer project generally involves several steps.
The exact process will depend on your property, but it may include:
Inspecting the sewer line. A camera is used to locate the damage and evaluate the pipe.
Determining the repair method. The plumber decides whether lining, bursting, excavation, or another solution is appropriate.
Cleaning the pipe. Debris, buildup, or roots may need to be removed before trenchless work begins.
Preparing access points. Small excavation areas may be created so technicians can reach the sewer line.
Completing the repair or replacement. Specialized trenchless equipment is used to rehabilitate or replace the damaged section.
Inspecting the finished work. The line may be checked again to confirm that the repair was completed correctly.
Restoring the access areas. The smaller access points are filled and cleaned up.
The key advantage is that the entire sewer line usually does not need to be exposed from above.
What Causes Sewer Lines to Fail?
Sewer pipes spend their lives underground, so it is easy to forget they are there until something goes wrong.
Several factors can damage them over time.
Tree Roots
Roots naturally seek moisture.
If a sewer pipe develops a tiny crack or loose connection, roots may grow toward that moisture and eventually enter the line.
Once inside, they can create blockages and put additional pressure on damaged sections.
Aging Materials
Older pipes do not last forever.
Depending on the material and installation conditions, sewer lines can corrode, crack, weaken, or develop rough interior surfaces over time.
Eventually, replacement or rehabilitation may be necessary.
Shifting Soil
Soil moves.
Freeze and thaw cycles, erosion, settling, construction activity, and other ground conditions can put pressure on buried plumbing.
That movement may cause pipes to shift, separate, or crack.
Heavy Buildup
Grease, debris, mineral deposits, and other materials can collect inside sewer lines.
Over time, that buildup can reduce the available space for wastewater to move through.
Severe blockages can contribute to backups and stress on the plumbing system.
Poor Installation
Some sewer problems begin with how the line was installed.
Improper slope, weak connections, inadequate support, or other installation issues can create trouble years later.
A camera inspection can help identify many of these problems.
How to Reduce the Risk of Future Sewer Problems
You cannot control everything happening underground, but you can make life easier for your sewer system.
Start by being careful about what goes down your drains.
Avoid treating the toilet like a trash can. Toilet paper and human waste are what the system is designed to handle.
Items such as wipes, feminine hygiene products, paper towels, cotton swabs, and other materials can contribute to clogs even when a package describes an item as flushable.
In the kitchen, avoid pouring grease and cooking oil down the drain.
Other good habits include:
Addressing recurring slow drains instead of ignoring them
Having persistent sewer problems professionally inspected
Knowing where the sewer line runs through your property
Watching for unusual wet areas in the yard
Paying attention to repeated gurgling or backups
Repairing known plumbing problems before they become emergencies
Think of your sewer line like any other major home system. Early attention is usually easier than emergency repair.
Why Professional Sewer Repair Matters
A damaged sewer line is not the kind of project most homeowners should try to diagnose by watching a few videos online.
You are dealing with buried plumbing that carries wastewater away from the home. Correct diagnosis, equipment selection, pipe preparation, and installation all matter.
Trenchless repairs also require specialized tools and experience.
A professional plumber can evaluate the entire situation rather than simply guessing based on symptoms.
That matters because a clogged pipe and a collapsed pipe can cause similar symptoms while requiring very different repairs.
The goal is not just to make the water disappear for today.
The goal is to identify the actual problem and provide a repair that restores reliable sewer performance.
FAQ About Trenchless Sewer Repair in Northern Virginia
Is trenchless sewer repair completely dig-free?
Not usually. Most trenchless projects still require one or more small access points. The difference is that plumbers generally do not have to excavate a long trench over the entire sewer line.
Can trenchless repair fix tree root damage?
Sometimes. Roots may first need to be removed from the sewer line. A plumber can then inspect the pipe and determine whether lining, replacement, or another method is appropriate.
Is trenchless sewer repair cheaper than traditional replacement?
It depends on the property and the type of damage. Trenchless work may reduce expenses related to restoring landscaping, concrete, driveways, patios, and other surfaces after the plumbing repair.
How do I know whether my sewer line can be repaired trenchlessly?
A sewer camera inspection is usually the first step. The plumber needs to see the condition, location, alignment, and extent of the damage before recommending a repair method.
Can a badly damaged sewer line still be repaired without digging everything up?
Possibly. Pipe bursting can sometimes replace severely damaged lines while limiting excavation. However, some conditions still require traditional digging.
How long does a trenchless sewer repair last?
Service life depends on the repair method, materials, installation quality, soil conditions, and other factors. Your plumber can explain the expected lifespan of the specific system being recommended.
Will trenchless sewer repair damage my driveway?
One of the major advantages of trenchless technology is that it may allow plumbers to repair a sewer line running beneath a driveway without removing large sections of the surface. The exact approach depends on access and pipe conditions.
What should I do if sewage is backing up into my home?
Stop using plumbing fixtures as much as possible and call a plumber promptly. Continued water use can send more wastewater toward an already blocked or damaged sewer line.
Call Kinnett Plumbing for Sewer and Emergency Plumbing Service
A sewer problem does not have to mean sacrificing your lawn, landscaping, driveway, and weekend plans. When trenchless technology is appropriate, it can provide a practical way to repair or replace damaged sewer piping while limiting excavation and reducing disruption around your property.
The first step is finding out exactly what is happening underground.
Kinnett Plumbing provides experienced plumbing service for homeowners and businesses in Woodbridge, VA, and surrounding Northern Virginia communities. Whether you are dealing with sewer trouble, a burst pipe, an overflowing toilet, a failing water heater, or another urgent plumbing problem, our experienced team is available 24/7 for emergency plumbing repairs.
We arrive prepared to diagnose the problem and make the necessary repairs as efficiently as possible. With years of plumbing experience, high-quality workmanship, and honest pricing, we work to restore your system while keeping you informed about what needs to be done and why.
If you are noticing recurring backups, sewer odors, slow drains, soggy areas in your yard, or other signs of a damaged sewer line, do not wait for the problem to get worse. Contact us today to schedule an inspection and learn whether trenchless sewer repair is the right solution for your Northern Virginia property.
If you have been searching for ejector pump service in Virginia, you may be wondering whether an ejector pump is the same thing as a sump pump. That is a fair question. Both pumps usually sit below the main level of a home, both collect unwanted water, and both move that water through a discharge pipe. However, they handle very different types of water and protect your property in different ways. Think of them as two tools hanging beside each other in a workshop. They may look similar, but you would not use a wrench when the job calls for a hammer.
Understanding the difference between an ejector pump and a sump pump can help you recognize plumbing problems sooner, communicate more clearly with your plumber, and avoid damage to your home. You do not need to know every technical detail. You simply need to understand what each pump does, where it is usually installed, and what warning signs suggest it needs attention.
What Is a Sump Pump?
A sump pump helps protect your basement or crawl space from groundwater and flooding. It is installed inside a sump pit, which is a basin placed at the lowest point of the area.
As groundwater builds up around your foundation, drainage pipes direct the water into the sump pit. When the water reaches a certain level, a float switch activates the pump. The pump then sends the water away from the house through a discharge line.
In plain language, a sump pump removes relatively clean water before it can spread across your basement floor.
A sump pump may handle water from:
Heavy rain
Rising groundwater
Foundation drainage systems
Melting snow
Minor water seepage around the foundation
Certain basement appliances, depending on the plumbing setup
The pump does not make your basement waterproof by itself. Instead, it works as part of a larger drainage system. Gutters, downspouts, grading, foundation drains, and waterproofing materials may all contribute to keeping the space dry.
What Is an Ejector Pump?
An ejector pump, also called a sewage ejector pump, moves wastewater and solid waste from plumbing fixtures located below the main sewer line.
Most household drains rely on gravity. Water from a toilet, sink, shower, or washing machine normally flows downhill into the sewer or septic system. However, gravity cannot do the job when a bathroom or laundry room is located below the level of the main drain line.
That is where an ejector pump comes in.
Wastewater flows into a sealed ejector basin. Once the basin reaches a set level, the pump turns on and pushes the wastewater upward into the building’s main sewer line. From there, the waste continues to the municipal sewer system or septic tank.
An ejector pump may serve:
A basement toilet
A basement shower or bathtub
A below-grade bathroom sink
A basement laundry room
A utility sink
A finished lower-level living space
A commercial area with plumbing fixtures below the sewer line
Unlike a sump pump, an ejector pump handles dirty wastewater that may contain toilet paper and solid waste. For that reason, the basin must be tightly sealed and properly vented.
The Main Difference: The Type of Water Each Pump Handles
The easiest way to remember the difference is to focus on what goes into the pump.
A sump pump handles groundwater. An ejector pump handles sewage and wastewater.
Here is a simple comparison:
Sump pump: Removes rainwater, groundwater, or foundation drainage water
Ejector pump: Removes wastewater from toilets, sinks, showers, and other plumbing fixtures below the sewer line
You should never direct sewage into a standard sump pit. A sump pump is not designed to process solids or safely contain sewer gases. Likewise, an ejector system should not be treated as a general basement drainage solution unless the plumbing system was specifically designed that way.
How the Pumps Are Installed
Both systems use a pump, basin, float switch, check valve, and discharge pipe. However, their installation requirements are not identical.
Sump Pump Installation
A sump pump is usually placed in an open or loosely covered pit. Some pits have airtight covers, particularly when radon control or moisture reduction is a concern, but the pump is not normally handling sewage.
The discharge pipe carries water outside and releases it a safe distance away from the foundation. The location of that discharge point matters. If the water empties too close to the house, it may flow back toward the foundation and return to the sump pit.
A sump pump system may also include:
A battery backup pump
A water-powered backup pump
A high-water alarm
A check valve
A dedicated electrical outlet
A sealed pit cover
A secondary pump
Ejector Pump Installation
An ejector pump sits inside a sealed basin. The lid must be secured to contain wastewater and prevent sewer gases from entering the home.
The system also needs a vent pipe. The vent allows gases to leave safely and helps air pressure remain balanced while the pump operates.
The discharge pipe connects to the main sewer line and typically includes a check valve. This valve prevents wastewater from flowing backward into the basin after the pump shuts off.
Because the pump handles sewage, installation and repairs should be completed by an experienced plumber. Incorrect connections can cause leaks, backups, odors, contamination, and code violations.
Do You Need a Sump Pump?
You may need a sump pump if your home has a basement or crawl space that is vulnerable to groundwater.
Common signs include:
Water entering the basement after heavy rain
Damp walls or floors
White, chalky mineral deposits on foundation surfaces
Musty odors
Mold or mildew growth
Standing water in a crawl space
Previous basement flooding
A high water table
Drainage problems around the foundation
Even if your basement has never flooded, a sump pump may be worth considering if neighboring homes have experienced water problems. Soil conditions and groundwater levels often affect multiple homes in the same area.
Homes in Woodbridge and other parts of Northern Virginia can experience periods of heavy rainfall and saturated soil. A working sump pump provides an important layer of protection when water begins collecting around the foundation.
Do You Need an Ejector Pump?
You usually need an ejector pump when you have plumbing fixtures below the level of your main sewer or septic line.
For example, imagine that you want to add a full bathroom to your basement. The toilet drain may sit several feet below the sewer pipe leaving your house. Waste cannot flow uphill on its own, so an ejector pump must lift it to the proper level.
You may need an ejector pump if:
You are adding a basement bathroom
Your lower-level bathroom drains slowly or backs up
A basement toilet will not flush correctly
You are moving a laundry area below grade
Your existing ejector pump is noisy or unreliable
You notice sewage odors near the ejector basin
An alarm is sounding near the pump system
A plumber can inspect the elevation of your drain lines and determine whether gravity drainage is possible. If not, an ejector pump will likely be required.
Can a Home Have Both Pumps?
Yes. Many homes have both an ejector pump and a sump pump.
The sump pump protects the basement from groundwater. The ejector pump carries wastewater from basement plumbing fixtures to the main sewer line.
The two systems may be located near each other, which is one reason homeowners sometimes confuse them. Look at the lids and connected pipes. An ejector basin is usually sealed and vented. A sump pit may have a simpler cover and will have a discharge line leading outdoors.
When you are unsure which pump you have, avoid removing covers or disconnecting pipes. A plumber can identify the system safely.
Warning Signs of a Failing Sump Pump
A sump pump should turn on when water rises and shut off after the pit has been emptied. If it does not follow that pattern, something may be wrong.
Watch for these warning signs:
The pump does not start when the pit fills
The pump runs constantly
The motor hums, but no water moves
The pump cycles on and off rapidly
Water remains in the pit
The unit makes grinding or rattling sounds
The discharge pipe is frozen or blocked
The circuit breaker repeatedly trips
The pump is more than seven to ten years old
A stuck float switch is a common problem. The switch may become tangled, blocked by debris, or pressed against the side of the pit. The pump may also fail because of a clogged intake, damaged motor, power outage, or obstructed discharge line.
Warning Signs of a Failing Ejector Pump
Ejector pump problems can become messy quickly because the system handles sewage. Stop using the connected fixtures and contact a plumber when you notice a possible failure.
Warning signs may include:
A basement toilet that will not flush
Wastewater backing up into a shower or floor drain
Sewage odors in the basement
Gurgling sounds from lower-level drains
An ejector alarm that will not stop
A pump that runs longer than usual
Loud banging, grinding, or humming
Wastewater leaking around the basin lid
Multiple basement drains becoming slow at the same time
Do not open a sewage ejector basin to investigate. The contents may contain harmful bacteria, and sewer gases can create health and safety risks. Leave the inspection and cleanup to trained professionals.
Maintenance Tips for Both Types of Pumps
Routine maintenance can help your pump operate more reliably and may reveal problems before the next major storm or plumbing emergency.
Sump Pump Maintenance
You can help care for a sump pump by:
Checking the pit for visible debris
Making sure the float can move freely
Confirming that the discharge point is clear
Testing the pump according to the manufacturer’s directions
Checking the backup battery
Scheduling a professional inspection before rainy seasons
Keeping stored belongings away from the pit
A basic test often involves slowly pouring clean water into the pit until the float rises. The pump should activate, remove the water, and shut off. Do not perform the test if the unit has exposed wiring, damaged components, or other safety concerns.
Ejector Pump Maintenance
Ejector pump maintenance is better left to a plumber because the basin contains sewage.
You can reduce the chance of trouble by:
Flushing only toilet paper and human waste
Keeping wipes out of the toilet, including products labeled flushable
Avoiding grease, paper towels, hygiene products, and cat litter
Paying attention to unusual sounds and odors
Responding quickly when an alarm activates
Scheduling professional service when recommended
Treat the system like a machine with a very specific job. The fewer inappropriate materials you put into it, the easier that job becomes.
Backup Power and Pump Alarms
Electric pumps cannot operate during a power outage unless they have a backup power source. Unfortunately, strong storms may cause both heavy rainfall and power failures at the same time.
A battery backup can keep a sump pump working when the primary system loses electricity. A high-water alarm can also warn you when water rises too far.
Ejector systems may use alarms to indicate that the wastewater level is unusually high. An alarm does not always mean the pump has completely failed, but it should never be ignored. Limit water use in the affected part of the house and call a plumber.
Why Professional Pump Service Matters
Pump installation involves more than placing a device into a basin and connecting a pipe. The system must be sized correctly, vented when required, connected to the appropriate drain or discharge point, protected by a check valve, and supplied with safe electrical power.
Professional service helps ensure that:
The pump has enough power for the required lift
The basin is the correct size
The float switch can move properly
The check valve is installed in the correct direction
The discharge line is properly routed
Sewage connections are sealed
Venting meets system requirements
The installation follows applicable plumbing codes
A pump that is too small may run constantly or fail during heavy use. A pump that is too large may cycle too quickly, which can shorten its service life. Correct sizing helps the equipment work efficiently and reliably.
Frequently Asked Questions
Is an ejector pump the same as a sump pump?
No. A sump pump removes groundwater from around the foundation. An ejector pump moves sewage and wastewater from plumbing fixtures located below the main sewer line.
Can an ejector pump handle toilet waste?
Yes. A sewage ejector pump is specifically designed to move wastewater that may contain toilet paper and solid waste.
Can a sump pump handle sewage?
No. A standard sump pump should not be used for sewage. It is designed for groundwater and relatively clean drainage water.
Why does my basement bathroom need an ejector pump?
It may need one because the bathroom drains are below the main sewer line. The pump lifts wastewater high enough to enter the sewer pipe.
How long do sump pumps last?
Many sump pumps last about seven to ten years, but the actual lifespan depends on usage, maintenance, water conditions, installation quality, and pump design.
How long do ejector pumps last?
A sewage ejector pump may last around seven to ten years or longer with proper installation and maintenance. Heavy use, clogs, and inappropriate materials can shorten its life.
What happens when an ejector pump fails?
Wastewater may stop draining and can back up into basement toilets, showers, sinks, or floor drains. Stop using the connected fixtures and call a plumber promptly.
What happens when a sump pump fails?
Groundwater can rise above the sump pit and flood the basement or crawl space. Fast repairs are especially important during heavy rain.
Does a sump pump need a backup battery?
A backup battery is not always required, but it is highly useful in areas where storms and power outages occur together.
Should I repair or replace an older pump?
That depends on the pump’s age, condition, repair history, and the cost of the damaged part. A plumber can help you compare the reliability of a repair with the long-term value of replacement.
Protect Your Home With Kinnett Plumbing
Whether you need a sump pump to defend your basement against groundwater or an ejector pump to support a below-grade bathroom, the right equipment and proper installation make a major difference. We can inspect your system, identify the type of pump you have, and recommend the appropriate repair, maintenance, or replacement service.
When a plumbing emergency strikes in Woodbridge, VA, or a surrounding community, you need a dependable plumber who can respond quickly and efficiently. A burst pipe, overflowing toilet, failed pump, sewage backup, or malfunctioning water heater can cause serious damage when it is not handled promptly.
Our experienced team is available 24/7 for emergency plumbing repairs. Our plumbers arrive equipped to diagnose problems and complete high-quality repairs as efficiently as possible. With honest pricing, professional service, and years of hands-on expertise, we help homeowners and businesses regain peace of mind during stressful plumbing situations.
Contact us today to schedule pump service or request emergency plumbing assistance in Woodbridge, VA, and surrounding areas.
When you need slab leak repair in Northern Virginia, the first thing to remember is that the problem is fixable. A leak beneath a concrete foundation sounds intimidating, but an experienced plumber can locate the damaged pipe, explain the available repair methods, and help you choose a practical solution. The important part is acting quickly. Water leaking under your home can increase your utility bills, damage flooring, encourage mold growth, and weaken nearby building materials.
Think of a slab leak like a loose hose hidden beneath a heavy workbench. You may not be able to see the hose, but you can spot the effects of the escaping water. The floor may feel warm, your water bill may rise, or you may hear water running when every faucet is turned off. A plumber uses specialized tools to trace the problem before deciding how to reach and repair the pipe.
What Is a Slab Leak?
Many homes are built on concrete slab foundations. Water supply lines and other plumbing pipes may run beneath or through that concrete. A slab leak occurs when one of those pipes cracks, develops a pinhole, separates at a connection, or otherwise begins releasing water below the foundation.
Both hot-water and cold-water lines can leak. Hot-water slab leaks are sometimes easier to notice because they may create an unusually warm area on the floor. Cold-water leaks can be less obvious and may continue for a long time before visible damage appears.
Common causes of slab leaks include:
Aging or corroded pipes
Excessively high water pressure
Soil movement beneath the home
Normal expansion and contraction of pipes
Improper installation
Abrasion caused by a pipe rubbing against concrete or another pipe
Damage from long-term vibration
Shifting or settling of the foundation
A slab leak does not automatically mean your foundation is failing. In many cases, the problem is limited to a damaged plumbing line. However, the longer water is allowed to escape, the greater the chance of damage to flooring, walls, cabinets, and other parts of the home.
Warning Signs of a Slab Leak
Slab leaks rarely announce themselves with one unmistakable sign. Instead, homeowners often notice several small clues that do not seem connected at first.
Watch for the following warning signs:
A sudden or unexplained increase in your water bill
The sound of running water when fixtures are off
Warm or damp areas on the floor
Cracked, warped, or discolored flooring
Musty odors
Mildew or mold near the bottom of walls
Low water pressure
Water collecting near the foundation
A water meter that continues moving when no water is being used
Cracks developing in walls or flooring
A higher water bill is especially important. Water rates can change, and household use can vary, but a large unexplained jump deserves attention. Turn off faucets, washing machines, dishwashers, ice makers, and other water-using appliances. Then look at your water meter. If it continues to register water use, you may have a hidden leak.
Do not start breaking through the flooring based on a guess. Slab leak detection should come before demolition. Accurate testing can reduce unnecessary damage and help the plumber select the least disruptive repair method.
What Happens During Slab Leak Detection?
The first service visit normally begins with questions. The plumber may ask when you noticed the problem, whether the water bill has increased, which rooms seem affected, and whether you have experienced previous leaks.
Next, the plumber may inspect exposed plumbing, flooring, walls, the water heater, and the area around the foundation. Depending on the situation, leak detection may involve:
Water pressure testing
Electronic listening equipment
Thermal imaging
Moisture meters
Line isolation tests
Video inspection equipment
Inspection of the water meter
Testing individual plumbing zones
Electronic listening equipment can help identify the sound created by pressurized water escaping from a pipe. Thermal imaging may reveal temperature differences associated with a hot-water leak. Moisture meters can identify damp areas that are not yet visible.
No single tool solves every case. A good diagnosis combines equipment readings with the plumber’s training and experience. The goal is to narrow the leak to the smallest practical area before recommending a repair.
What to Expect During Slab Leak Repair
After locating the leak, the plumber should explain what failed, where the problem is located, and which repair options make sense. There are several ways to repair a slab leak, and the best method depends on the location of the damaged pipe, the age of the plumbing system, and the condition of nearby lines.
Direct Access or Spot Repair
A direct-access repair involves opening the floor and concrete above the damaged section. The plumber removes enough material to reach the pipe, cuts out the failed section, installs new piping, and tests the repair.
This approach may be appropriate when:
The leak location is precise
The damaged area is easy to reach
The surrounding pipe is in good condition
Only one isolated section has failed
The flooring can be removed and restored reasonably
Spot repair can be effective, but it is not always the least expensive choice once flooring and concrete restoration are included. A leak under a utility room floor may be fairly manageable. A leak under custom cabinets, stone flooring, or a finished living area may require more extensive restoration.
Pipe Rerouting
Rerouting means abandoning the leaking section and installing a new pipe along a different path. The new line may run through walls, ceilings, an attic, or another accessible area rather than beneath the slab.
Rerouting may be recommended when:
The leak is difficult to access
Opening the slab would damage expensive finishes
The existing underground route is no longer practical
The pipe has multiple weak areas
A new route offers a more dependable long-term solution
Rerouting may sound like a larger project, but it can reduce concrete demolition and make future access easier.
Pipe Lining
In some situations, a damaged pipe can be repaired from the inside with an epoxy lining. The line is cleaned and dried before a coating is applied to seal small cracks or pinhole leaks.
Pipe lining is not appropriate for every plumbing system. A collapsed, badly corroded, or separated pipe may need to be replaced instead. Your plumber should inspect the line and explain whether lining is suitable for its size, material, and condition.
Partial or Whole-House Repiping
One slab leak does not always mean the entire house needs new plumbing. However, repeated leaks in older pipes may signal a system-wide problem. Repairing one weak section at a time can become frustrating and expensive.
A partial or whole-house repipe may be worth discussing when:
The home has experienced several leaks
The pipes are near the end of their expected service life
Corrosion is visible in multiple areas
Water quality has deteriorated
Water pressure is inconsistent
Several lines run beneath the slab
The cost of repeated repairs is approaching the cost of replacement
Repiping is a significant project, but it may provide better long-term value when the existing system has widespread deterioration.
How Much Does Slab Leak Repair Cost in Northern Virginia?
Slab leak repair prices vary widely because the phrase “slab leak repair” can describe anything from sealing a small section of pipe to rerouting multiple water lines.
Recent national cost guides place many slab leak repairs between approximately $630 and $4,400, with average projects around $2,300. Other published estimates place direct foundation access and pipe replacement between roughly $700 and $5,000, while more extensive rerouting or repiping can cost considerably more.
For planning purposes, homeowners may encounter costs such as:
Leak detection and diagnostic testing
Opening walls, floors, or concrete
Repairing or replacing the damaged pipe
Rerouting a water line
Pressure testing the completed work
Concrete patching
Flooring replacement
Drywall repair and painting
Cabinet removal or reinstallation
Water extraction and drying
Mold remediation when needed
A relatively accessible leak with limited damage may stay near the lower end of the range. A leak under finished flooring, built-in cabinetry, or a difficult part of the foundation can cost more. Whole-house repiping may reach several thousand dollars because it involves installing multiple new supply lines rather than repairing one isolated section.
Northern Virginia labor rates, home layouts, permit requirements, and building materials can also influence pricing. The only dependable way to know the cost for your property is to have the plumbing system inspected and receive a written estimate based on the actual repair plan.
What Factors Affect the Final Price?
The Location of the Leak
A pipe beneath an open utility area is usually easier to reach than one beneath a kitchen island, bathroom tile, staircase, or load-bearing wall. Difficult access increases labor and restoration costs.
The Repair Method
Direct repair, rerouting, pipe lining, and repiping involve different materials and labor. The lowest initial estimate is not always the best long-term choice. Ask how likely the surrounding pipe is to develop another leak.
Pipe Material and Condition
Copper, PEX, CPVC, and other materials require different repair techniques. Severe corrosion or multiple weak sections can turn a small repair into a larger replacement project.
Flooring and Interior Finishes
Concrete repair may represent only part of the total. Hardwood, tile, carpet, cabinets, drywall, and paint may need to be removed or restored.
Water Damage
Standing water can damage baseboards, insulation, drywall, flooring, furniture, and stored belongings. Drying and restoration may be necessary in addition to plumbing work.
Emergency Timing
An active leak cannot always wait until regular business hours. Emergency service may cost more, but quickly stopping the water can prevent a much larger damage bill.
How Long Does Slab Leak Repair Take?
A straightforward spot repair may be completed in a day once the leak is located and the work area is prepared. Rerouting may take one or more days, depending on the length of the new line and the number of walls or ceilings involved.
Repiping and extensive restoration can take longer. Your plumber should explain the expected schedule, which rooms will be affected, when the water must be turned off, and whether separate flooring or drywall contractors will be needed.
Leak detection is sometimes completed during the initial appointment, but difficult cases may require additional testing. Taking the time to locate the leak accurately is better than opening several areas based on guesswork.
What Should You Do While Waiting for a Plumber?
When you suspect an active slab leak, take simple steps to limit the damage:
Shut off the main water supply if water is actively spreading.
Turn off the water heater if the hot-water system is involved.
Move furniture, rugs, boxes, and valuables away from damp areas.
Avoid using electrical devices near standing water.
Take photographs of visible damage.
Record unusual water-meter activity.
Contact a plumber as soon as possible.
Notify your insurance company when significant damage has occurred.
Do not pour leak-sealing chemicals into your plumbing system unless a qualified plumber specifically recommends them. These products may not reach the damaged area and can complicate professional repairs.
Will Homeowners Insurance Cover a Slab Leak?
Coverage depends on the policy and the cause of the damage. Some homeowners’ insurance policies may cover sudden water damage to flooring, drywall, cabinets, or personal belongings. They may also cover some of the work required to access a leaking pipe.
However, the policy may not pay for the failed pipe itself. Damage caused by long-term neglect, gradual corrosion, poor maintenance, or an excluded foundation issue may not be covered.
Contact your insurance company promptly, document the damage, and ask for a clear explanation of:
Access coverage
Pipe repair coverage
Water-damage restoration
Mold limits
Deductibles
Required documentation
Contractor estimate requirements
Your plumber can document the leak location and recommended repair, but the insurance company determines coverage.
How Can You Reduce the Risk of Another Slab Leak?
Not every leak is preventable, but basic maintenance can reduce stress on your plumbing system.
Have your water pressure checked, especially if faucets bang, fixtures fail frequently, or supply lines seem to wear out quickly. Excessively high pressure places unnecessary force on pipes, valves, water heaters, and appliance connections.
Pay attention to your water bill and inspect exposed plumbing regularly. Small changes are easier to address before they become major emergencies. If your home has experienced repeated pinhole leaks, ask whether water chemistry, pipe age, electrical grounding, or high pressure could be contributing to the problem.
Most importantly, do not ignore early warning signs. Quick leak detection can mean the difference between a contained plumbing repair and a larger flooring and water-damage project.
Frequently Asked Questions
Is a slab leak an emergency?
It can be. Shut off the main water supply and call a plumber promptly if water is spreading, flooring is lifting, pressure has dropped suddenly, or you hear continuous running water.
Can a slab leak damage the foundation?
Yes. Long-term moisture can wash away supporting soil, contribute to movement, and damage nearby materials. Fast repair helps limit the risk.
Can I repair a slab leak myself?
Slab leak diagnosis and repair require specialized equipment and plumbing knowledge. A do-it-yourself attempt may damage flooring or concrete without reaching the actual leak.
Does every slab leak require breaking concrete?
No. Some leaks can be addressed through pipe rerouting or, in suitable cases, internal pipe lining. The best method depends on the pipe’s location and condition.
How do plumbers find a leak under concrete?
Plumbers may use pressure testing, electronic listening equipment, thermal imaging, moisture meters, and line-isolation tests to narrow down the location.
Why is part of my floor warm?
An unexplained warm area may indicate a leaking hot-water line beneath the slab. It can also have other causes, so professional testing is recommended.
Will the water need to be shut off?
Usually, yes. The plumber may shut off the entire home or isolate one part of the system. Ask how long the interruption is expected to last.
Is one slab leak a sign that I need repiping?
Not necessarily. One isolated failure may only require a local repair. Repeated leaks or widespread corrosion may make repiping more practical.
How can I tell whether the estimate includes restoration?
Ask for an itemized written estimate. Confirm whether concrete, flooring, drywall, paint, cabinets, cleanup, and permits are included or handled separately.
How quickly should I schedule service?
Schedule an inspection as soon as you notice warning signs. Hidden leaks usually become more expensive, not less expensive, when left alone.
Call Kinnett Plumbing for Slab Leak and Emergency Plumbing Service
A suspected slab leak is not a problem to put on next month’s list. The sooner the leak is located, the sooner you can protect your flooring, foundation, plumbing system, and belongings.
We provide professional slab leak repair and leak detection for homeowners in Northern Virginia, including Woodbridge, Manassas, Dale City, Lake Ridge, Centreville, Montclair, McLean, Reston, and surrounding communities. We also offer 24/7 emergency plumbing service for urgent problems such as burst pipes, severe leaks, overflowing toilets, backed-up drains, and failing water heaters.
When a plumbing emergency strikes, fast action matters. Our team arrives prepared to diagnose the issue, explain the repair options, and work toward a dependable solution. You receive experienced service, straightforward communication, and honest pricing during a situation that can otherwise feel overwhelming.
Contact us today to schedule slab leak detection, request a repair estimate, or get immediate help with a plumbing emergency in Woodbridge or the surrounding Northern Virginia area.
A member of our team will be in touch shortly to confirm your contact details or address questions you may have.
[contact-form-7 id="104" title="Contact form 1"]
Proudly Serving Manassas, VA and Surrounding Areas

 Rated 4.9 (974) Reviews








 Jennifer Bishop